Android: Improving the sign-in experience with Google Sign-In and SmartLock
How many times have you struggled to sign in to a freshly downloaded app? How many times have you registered on a social network, a streaming service or a productivity tool and found that they also provide a mobile solution?
A lot of apps provide an attractive UI, even on their log-in screens, but the actual UX is somewhat more painful – but more valuable, when you’re trying to attract and retain new users.
Fixing this is a lot simpler than you might think. Google already provides us with two ways of improving the sign-in experience in our apps.
Google Sign-In (previously known as Google+ Sign-In)
and SmartLock
The majority of users download an app and want to interact with it quickly – especially if it’s a productivity tool or some kind of a social network.
What a better way of helping them by letting them sign-in with just one tap?
Almost every Android user adds his/her Google account during the setup process. Most of the time this is their primary email address, which means it’s the email they use when they sign-up on various services. But usually, people tend to add more emails and Google accounts on their phones, for example: their work email.
This is something we can leverage in order to ease the sign-in process. To achieve this, we will use the Google Account Login package,
compile 'com.google.android.gms:play-services-auth:x.x.x'
from Play Services, which includes Google Sign-In API, as well as the Credential API for SmartLock. For the needs of this article we’ve also created a demo app which is available on Github.
So without further ado, let’s dive in the actual implementation.
Google Services Configuration File
To start using Google Services we first need to create a configuration file. This process has also been streamlined and it’s just one click to download it. You can find detailed instructions here. After downloading it, place it inside your “app” folder and you’re good to go.
Google Sign-In
Google Sign-In was previously known as Google+ Sign-In, back when Google required every new user to also create a Google+ social profile.
After Google dropped that requirement, all of their services were rebranded to plain ‘Google’, like ‘Google Sign-In’, for example.
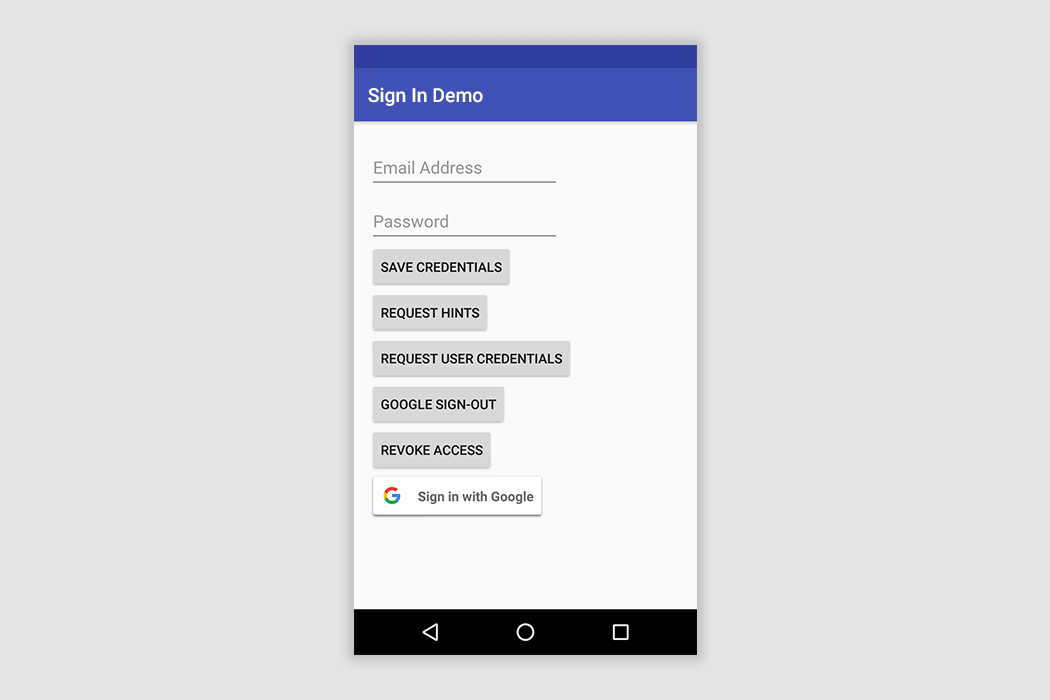
As you can see at the bottom of the screenshot, this is the rebranded Google Sign-In button offered as a standalone view from Google.
<com.google.android.gms.common.SignInButton
        android:id="@+id/sign_in_button"
        android:layout_width="wrap_content"
        android:layout_height="wrap_content" />
Google Sign-In button (XML)
Now that we’ve added the Sign-In Button we need to configure it on our activity as well.
private lateinit var signInButton: SignInButton

override fun onCreate(savedInstanceState: Bundle?) {
    super.onCreate(savedInstanceState)

    setContentView(R.layout.activity_sign_in)

    initViews()
}

private fun initViews() {
    signInButton = findViewById(R.id.sign_in_button) as SignInButton

    signInButton.setSize(SignInButton.SIZE_WIDE)

    signInButton.setOnClickListener {
        initiateGoogleSignIn()
    }
}
Google Sign-In button configuration
We also need to configure the GoogleApiClient, which will handle the Google Sign-In API and Credentials API requests:
private fun initGoogleApiClient() {
    googleApiClient = GoogleApiClient.Builder(this)
            .addConnectionCallbacks(this)
            .enableAutoManage(this, this)
            .addApi(Auth.GOOGLE_SIGN_IN_API, googleSignInOptions)
            .addApi(Auth.CREDENTIALS_API)
            .build()
}
Google API Client initial configuration
Let’s explain what these lines do:
- addConnectionCallbacks → Makes the current Activity aware of GoogleApiClient connection lifecycle.
- enableAutoManage → Lets GoogleApiClient “hook” on the current Activity in order to manage the connect-disconnect operations based on the Activity’s lifecycle.
- addApi(Auth.GOOGLE_SIGN_IN_API, googleSignInOptions) → Here we’re declaring that we will use the Google Sign-In API, with the GoogleSignOptions we’ve already created.
- addApi(Auth.CREDENTIALS_API) → We will also use the Credentials API for SmartLock, so we’re declaring this one as well.
We’re finally ready to proceed with the normal Google Sign-In flow. First step is to startActivityForResult with the Sign-In Intent when tapping on the Sign-In Button:
private fun initiateGoogleSignIn() {
    val signInIntent = Auth.GoogleSignInApi.getSignInIntent(googleApiClient)
    startActivityForResult(signInIntent, RC_SIGN_IN)
}
Initiate Google Sign-In
After that we’re ready to handle the result in onActivityResult:
override fun onActivityResult(requestCode: Int, resultCode: Int, data: Intent?) {
    super.onActivityResult(requestCode, resultCode, data)

    when (requestCode) {
        RC_SIGN_IN -> handleGoogleSignInResolution(resultCode, data)
    }
}
Google Sign-In Resolution handling
We can now process the result of Google Sign-In in order to update our UI. Depending on the result, we either sign-in the user or present them with a sign-up screen. All of these cases are implemented in detail on the demo project accompanying this article.
SmartLock
SmartLock is a powerful password manager that Google provides through the same Google Account Login package in Play Services.
But what does SmartLock offer for us as developers and for our end users?
SmartLock allows us to:
- Ask users to save their credentials.
- Request those credentials when opening the app.
- Use credentials saved on Chrome, if we declare that our website and app can share credentials.
- Display email hints in case we want to help the user in the sign-in/sign-up process.
- Finally and most importantly, all of the above are stored on Google’s servers and users have complete control over what is saved/deleted.
We’ll cover all these cases in detail below, but if you think there might be something missing, please make sure to check the demo project on Github.
1) Ask users to save their credentials
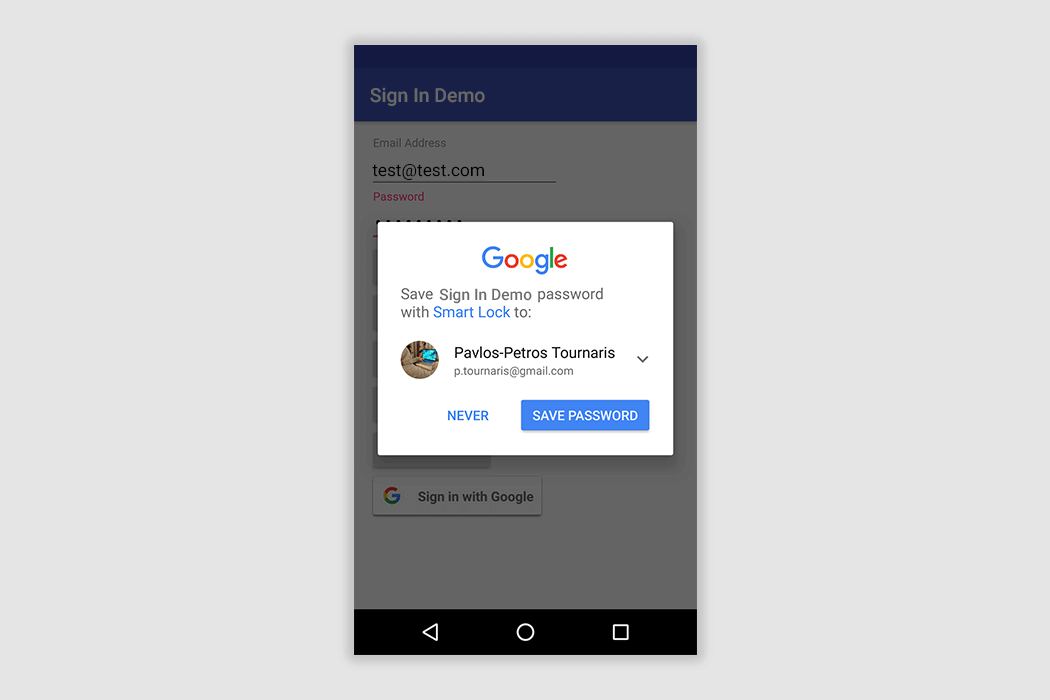
First, we check to make sure the email address and password are valid for our business logic (this is a quick implementation for the purpose of the demo) and after that, we create the Credential object. Finally, we invoke the Credentials API in order to save the previously created Credential. Below, you can see how that is presented to a user.
private fun saveCredentials() {

    val emailInvalid: Boolean = emailAddressTextInput.editText?.text.toString().trim().isNullOrEmpty() ?: false
    val passwordInvalid: Boolean = passwordTextInput.editText?.text.toString().trim().isNullOrEmpty() ?: false

    if (emailInvalid) {
        emailRequirementError()
        return
    }

    if (passwordInvalid) {
        passwordRequirementError()
        return
    }

    val credentialToSave: Credential =
        Credential
            .Builder(emailAddressTextInput.editText?.text.toString())
            .setPassword(passwordTextInput.editText?.text.toString().trim())
            .build()

    Auth
        .CredentialsApi
        .save(googleApiClient, credentialToSave)
        .setResultCallback({
            result ->
            handleCredentialSaveResult(result)
        })
}
A quick implementation of a Credentials save procedure
Credential is a key element of the SmartLock domain. It holds all the credential information (either account type or password, a name and a profile picture URI) related to an E-mail address. Credentials can either have an Account Type or a Password.
We can also see that the credentials we just saved are available on passwords.google.com for the E-mail address we previously selected:

2) Request credentials when opening the app
After saving the aforementioned credentials, we can now request them when opening the app in order to automatically sign a user in, or give them the ability to use them for instant sign-in.
In order to request Credentials we need to create a CredentialRequest that specifies what kind of Credentials we want. You can declare that the Credentials you want should contain a password or their type is one of: Google, Facebook, Twitter etc.
private fun initSmartlockCredentialsRequest() {
    smartlockCredentialsRequest = CredentialRequest.Builder()
            .setPasswordLoginSupported(true)
            .build()
}
SmartLock Credential Request configuration
After creating your CredentialRequest object, you pass it to Credentials API and you handle the result:
private fun requestCredentials() {
    Auth
            .CredentialsApi
            .request(googleApiClient, smartlockCredentialsRequest)
            .setResultCallback({ credentialRequestResult ->
                handleCredentialRequestResult(credentialRequestResult)
            })
}
Request Credentials
private fun handleCredentialRequestResult(credentialRequestResult: CredentialRequestResult) {
    if (credentialRequestResult.status.isSuccess) {
        proceedOnMainScreen(credentialRequestResult.credential.id)
    } else {
        resolveCredentialRequest(credentialRequestResult.status)
    }
}
Credentials Request Result handling
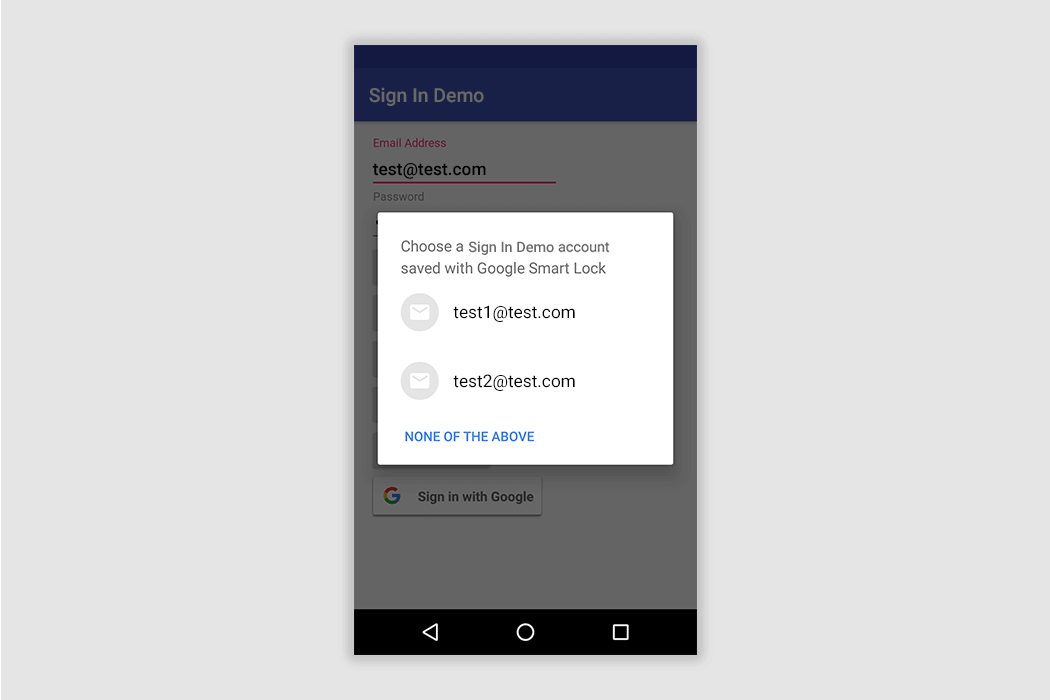
private fun resolveCredentialRequest(status: Status?) {
    if (status?.statusCode == CommonStatusCodes.RESOLUTION_REQUIRED) {
        initiateCredentialRequestResolution(status)
    } else {
        credentialRequestFailure()
    }
}
Resolve Credential Request
private fun initiateCredentialRequestResolution(status: Status?) {
    try {
        status?.startResolutionForResult(this, RC_CREDENTIALS_REQUEST)
    } catch (sendIntentException: IntentSender.SendIntentException) {
        credentialRequestResolutionFailure()
    }
}
Start resolution for Credential Request
One thing you should consider here, is that the Credential object retrieved does not have an “email” field. Actually the email on the Credential is named “id”. Another strange thing is that if you’ve requested Credentials of specific Account types, you need to have in mind that they will not contain a password, due to the fact that Account type and password fields can not co-exist.
3) Use Credentials saved on Chrome, if we declare that our website and app can share Credentials
User Credentials saved on Chrome can be very valuable for our case as well. Well, SmartLock offers Credential sharing between Chrome and Android applications. All we need to do is:
- Create a Digital Asset Links JSON file (assetlinks.json)
- Upload it on our server, under "/.well-known/" directory
On this link you can find detailed steps on how you can create the Digital Asset Links JSON file and add it to your app.
The last step to enable this integration is to fill out an Affiliation Form, which usually takes 2 or 3 days to be accepted.
At this point, we have to thank Steven Soneff from Google’s Identity team, for his valuable help on this process.
4) Display email hints in case we want to help the user in the sign-in/sign-up process
As a nice fallback when a user does not have any Credentials stored for our app, we can display some E-mail hints, in order to help the user choose an E-mail to sign-in or sign-up.
So how can we do this?
The steps are pretty much the same for it as well.
Google Account Login APIs are quite identical which helps us easily bootstrap the requests.
private fun initHintRequest() {
    hintRequest = HintRequest.Builder()
            .setHintPickerConfig(
                    CredentialPickerConfig.Builder()
                            .setShowCancelButton(true)
                            .setPrompt(CredentialPickerConfig.Prompt.SIGN_IN)
                            .build()
            )
            .setEmailAddressIdentifierSupported(true)
            .build()
}
Email Hint Request configuration
Let’s explain this code a little bit: We set the HintRequest to support email addresses and we also add a HintPicker configuration, which allows us to show a cancel button and also have a prompt as the dialog’s title. In our case we chose to show a sign-in prompt. Google also provides a sign-up prompt.
Afterwards, we need to invoke startIntentSenderForResult:
private fun requestEmailHints() {
    val intent = Auth.CredentialsApi.getHintPickerIntent(googleApiClient, hintRequest)
    try {
        startIntentSenderForResult(intent.intentSender, RC_HINT_REQUEST, null, 0, 0, 0)
    } catch (e: IntentSender.SendIntentException) {
        emailHintRequestFailure()
    }
}
Request Email Hints
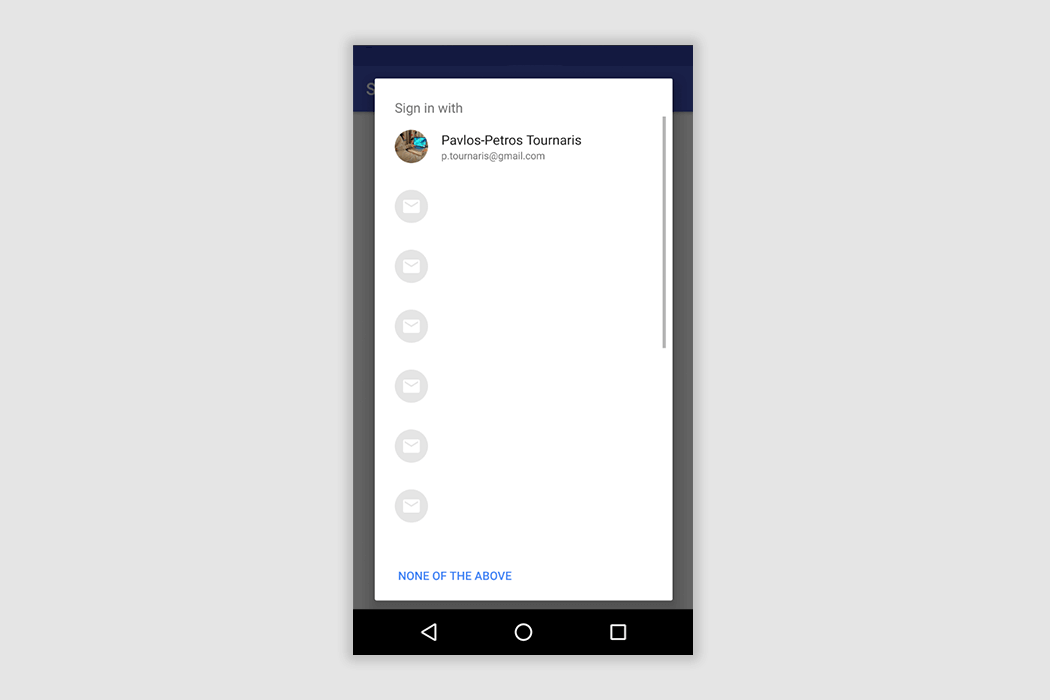
And to follow, we handle the result:
override fun onActivityResult(requestCode: Int, resultCode: Int, data: Intent?) {
    super.onActivityResult(requestCode, resultCode, data)

    when (requestCode) {
        RC_HINT_REQUEST -> handleEmailHintRequestResolution(resultCode, data)
    }
}
Result of Email Hint Request
The result on this case contains a Credential object including the email address that the user has selected:
private fun handleEmailHintRequestResolution(resultCode: Int, data: Intent?) {
    if (resultCode == AppCompatActivity.RESULT_CANCELED) {
        emailHintRequestCancelled()
    } else {
        emailHintRequestSuccess(data)
    }
}
Handling of Email Hint Request Resolution
private fun emailHintRequestSuccess(data: Intent?) {
    val credential: Credential? = data?.getParcelableExtra(Credential.EXTRA_KEY)
    credential?.let {
        proceedOnMainScreen(it.id)
    }
}
Email Hint Request success
Conclusion
Google Sign-In and SmartLock possible outcomes can produce a lot of boilerplate code, as well.
To help you with this task and allow you to focus on the engineering process of your business logic, we’ve created a module, named AuthManager. AuthManager handles all of the cases and their outcomes, described above, while providing a fluent API. AuthManager is also written 100% in Kotlin.
You can find AuthManager on Github.
Feedback and PullRequests are always welcome.
This article was written by Pavlos and Vasilis, as part of a series of posts explaining how we created Android and iOS apps for Workable recruiting software.

